⚠️ Emergency Alert
If your child has a knocked-out PERMANENT tooth, time is critical. Find the tooth, hold it by the crown (white part) only, rinse gently if dirty, and either replant it in the socket or store it in milk. Get to a dentist or emergency room within 30 minutes if possible. Every minute counts—teeth reimplanted within 5 minutes have the highest survival rate.
Quick Answer
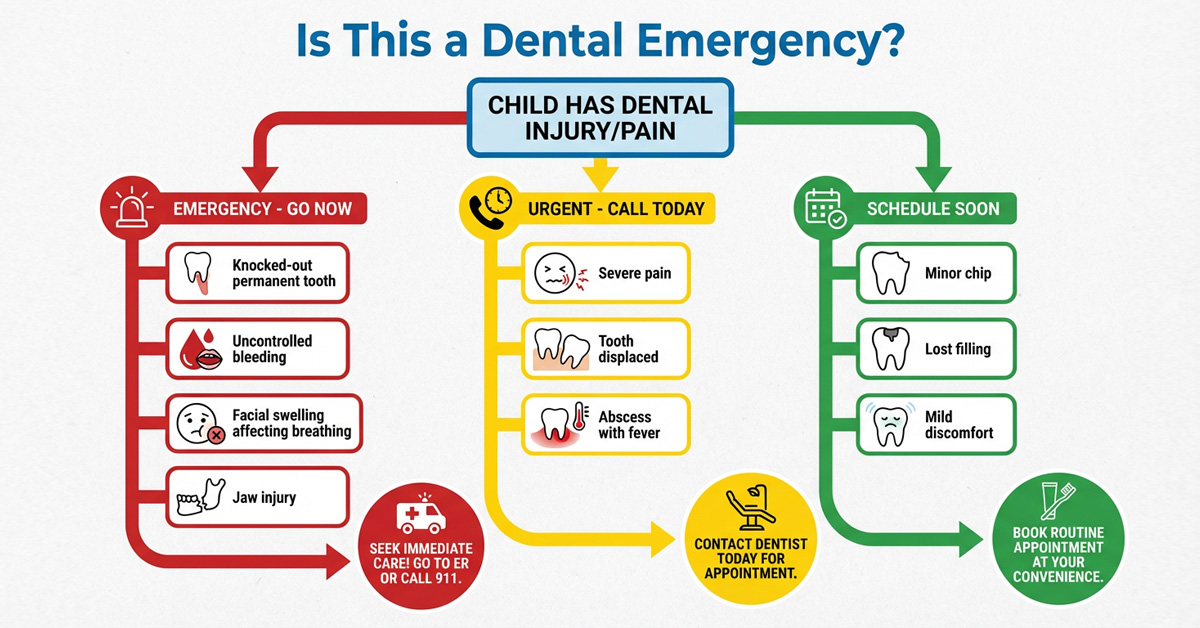
True dental emergencies requiring immediate care include: knocked-out permanent teeth, uncontrolled bleeding, facial swelling affecting breathing/swallowing, severe infection, and broken jaw. Less urgent issues like chipped teeth, mild toothaches, and lost fillings should be addressed within 24-48 hours but usually aren’t life-threatening. Knowing the difference—and having a plan—helps you stay calm and take the right action when your child is hurt.
Key Takeaways
- ✓ Knocked-out permanent teeth can often be saved if reimplanted within 30-60 minutes
- ✓ Baby teeth should NOT be reimplanted (could damage permanent tooth underneath)
- ✓ Facial swelling with fever is a serious infection requiring urgent care
- ✓ Most chipped teeth aren’t emergencies but should be evaluated within 24-48 hours
- ✓ Gray or dark teeth after trauma indicate nerve damage—see a dentist promptly
- ✓ Have your pediatric dentist’s emergency contact number saved in your phone
True Emergencies vs. Urgent Dental Issues
Not every dental problem is a true emergency, but knowing the difference helps you respond appropriately.
The American Academy of Pediatric Dentistry provides guidelines for categorizing dental injuries by urgency.
| TRUE EMERGENCY (Immediate Care) | URGENT (Within 24 Hours) | LESS URGENT (Within 48-72 Hours) |
|---|---|---|
|
|
|
| → ER or emergency dentist NOW | → Call dentist same day | → Schedule appointment soon |
Knocked-Out Teeth (Avulsed Teeth)
A knocked-out tooth is one of the few true dental emergencies where minutes matter.
According to the American Association of Endodontists, teeth reimplanted within 5 minutes have the highest survival rate.
The approach differs dramatically depending on whether it’s a baby tooth or permanent tooth.
Permanent Tooth Knocked Out: Step-by-Step
⏱️ TIME IS CRITICAL — Act within 30 minutes for best outcome
- Find the tooth immediately. Handle it ONLY by the crown (white chewing surface)—NEVER touch the root (the yellowish pointed end).
- If the tooth is dirty, rinse it gently with milk or saline for no more than 10 seconds. Do NOT scrub, scrape, or use soap, alcohol, or tap water for extended rinsing.
- Try to replant the tooth. If the child is calm enough, gently push the tooth back into the socket (make sure it’s facing the right way). Have the child bite on a clean cloth to hold it in place.
- If you cannot replant it, store the tooth in one of these (in order of preference):
- Milk (best readily available option)
- Child’s saliva (have them hold it in their cheek if old enough)
- Saline solution (contact lens solution)
- Saliva (parent can hold in cheek)
- NEVER let it dry out or store in water
- Get to a dentist or ER immediately. Call ahead so they can prepare. Bring the tooth with you.
Baby Tooth Knocked Out: Different Approach
Baby teeth should NOT be reimplanted.
Reimplanting a baby tooth can damage the developing permanent tooth underneath. Instead:
- Apply gentle pressure with gauze to control bleeding
- Apply a cold compress to reduce swelling
- Contact your pediatric dentist (same-day appointment preferred, but not a middle-of-the-night emergency)
- Save the tooth to bring to the dentist (to confirm it’s complete)
Your dentist will evaluate whether a space maintainer is needed to preserve room for the permanent tooth.
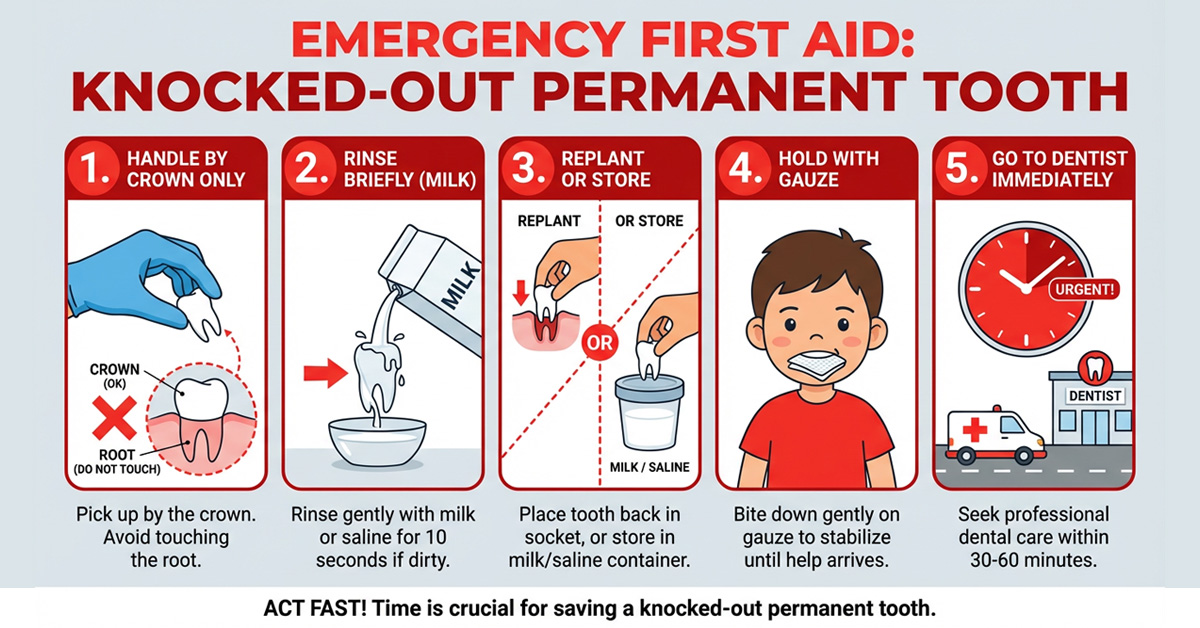
📷 IMAGE PROMPT: Create a step-by-step first aid illustration for “Knocked-Out Permanent Tooth.” Show 5 panels: 1) Hand picking up tooth by crown only (with X over root), 2) Rinsing tooth briefly with milk, 3) Replanting tooth into socket OR storing in milk container, 4) Child holding gauze in mouth, 5) Clock showing urgency + car heading to dentist. Use clear numbered steps. Include small diagrams showing crown vs. root of tooth. Emergency-style but not scary. Red and white color scheme.
How to Tell Baby Tooth vs. Permanent Tooth
| Baby Tooth | Permanent Tooth |
|---|---|
| Smaller, whiter, more rounded | Larger, slightly yellower, more angular |
| Short, thin root (may be partially resorbed) | Long, thick root |
| Typically front teeth ages 6-8, back teeth ages 10-12 | Front teeth starting age 6-7, back teeth age 11-13 |
When in doubt, save the tooth in milk and let the dentist determine what type it is.
Clinical Insight
“I’ve seen parents make two common mistakes with knocked-out teeth. First, they scrub the root trying to clean it—this destroys the delicate cells needed for the tooth to reattach. Second, they store the tooth in water, which actually damages root cells through osmosis. Milk is your best friend here because its pH and osmolality are similar to the cells on the tooth root. I keep a small container of milk in my fridge specifically for this reason, and I recommend all parents of active kids do the same—especially during sports seasons.”
— Mary G. Trice
Chipped or Broken Teeth
Chipped and broken teeth are extremely common in children—falling is a normal part of childhood.
The severity determines how urgently treatment is needed.
According to the American Dental Association, the priority is to prevent further damage and address any pain.
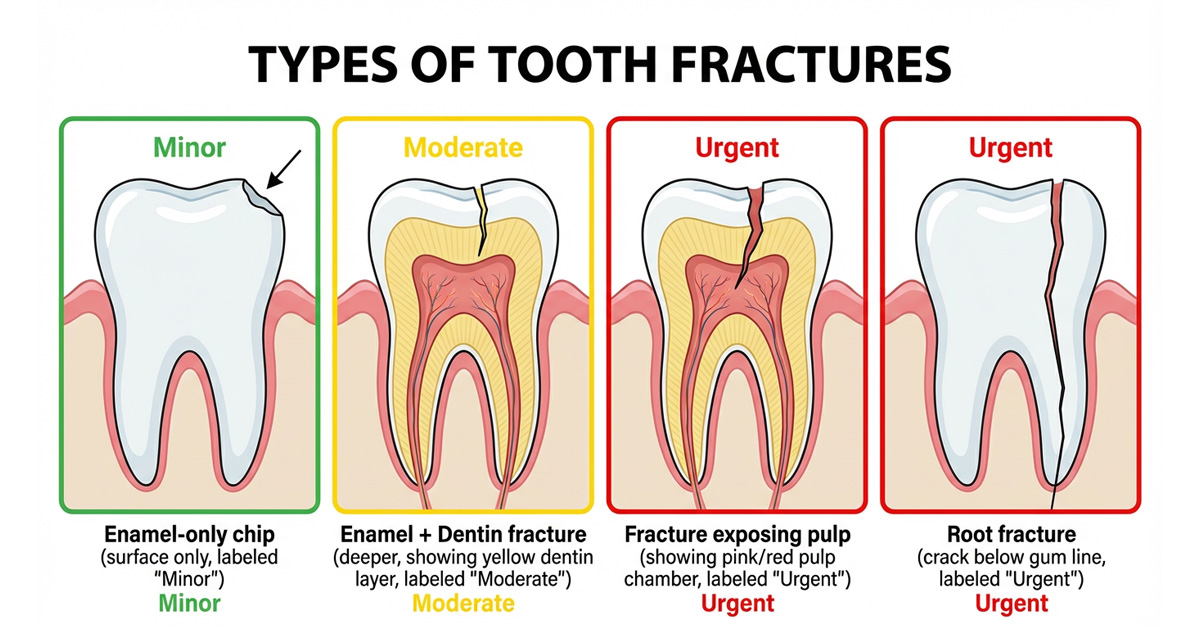
Types of Tooth Fractures
| Type | What It Looks Like | Urgency | Treatment |
|---|---|---|---|
| Enamel chip (minor) | Small piece off edge; no pain; white/translucent | Low—schedule within a week | Smoothing or bonding |
| Enamel + dentin fracture | Larger chip; yellowish layer visible; sensitive to temperature | Moderate—within 24-48 hours | Bonding, filling, or crown |
| Fracture with pulp exposure | Pink or red spot visible; bleeding from tooth; severe pain | HIGH—same day emergency | Pulp treatment (pulpotomy/root canal) + crown |
| Root fracture | Tooth may look normal but is loose; pain when biting | HIGH—same day | X-ray needed; may need splinting or extraction |
Immediate First Aid for Chipped Teeth
- Rinse mouth gently with warm water to clean the area
- Apply cold compress to the face/lip near the injury to reduce swelling
- Save any tooth fragments if found—bring them to the dentist (sometimes they can be bonded back)
- Cover sharp edges temporarily with sugar-free gum or dental wax to protect the tongue and cheek
- Give pain medication if needed (ibuprofen or acetaminophen as directed)
- Soft foods only until the dentist can repair the tooth
- Contact your dentist to describe the injury and get guidance on timing
Toothaches in Children
Toothaches have many causes—from something as simple as food stuck between teeth to serious infection.
The intensity and characteristics of the pain help determine how quickly your child needs to be seen.
Common Causes of Toothache in Children
- Cavity (tooth decay): Most common cause; pain may be mild initially, worsening over time
- Dental abscess/infection: Severe, throbbing pain; possible swelling and fever
- Erupting teeth: Discomfort as new teeth (including 6-year molars) break through
- Food impaction: Something stuck between teeth causing pressure and pain
- Cracked or fractured tooth: Pain when biting or with temperature changes
- Gum irritation: From popcorn hull, chip, or other irritant
- Teeth grinding (bruxism): Sore teeth and jaw, especially in the morning
- Sinus infection: Upper tooth pain when sinuses are congested
Home Care for Toothaches
- Rinse with warm salt water: 1/2 teaspoon salt in 8 oz warm water; have child swish and spit
- Floss gently: Remove any food that may be stuck between teeth
- Give appropriate pain medication: Children’s ibuprofen or acetaminophen as directed by age/weight
- Apply cold compress: On the outside of the cheek (not directly on tooth)
- Avoid hot, cold, and sweet foods: These can worsen sensitivity
- Keep head elevated: Blood flow to the area can increase pain; extra pillow at bedtime helps
⚠️ Warning Signs—Seek Care Immediately
- Fever above 101°F with tooth pain
- Visible swelling of face, jaw, or gums
- Difficulty swallowing or breathing
- Pus or foul taste in mouth
- Pain that doesn’t respond to over-the-counter medication
- Pain that wakes child from sleep
Dental Infections and Abscesses
A dental abscess is a pocket of pus caused by bacterial infection—and it can become a medical emergency if it spreads.
According to the CDC, dental infections are a leading cause of emergency room visits in children, and they can become life-threatening if not treated promptly.
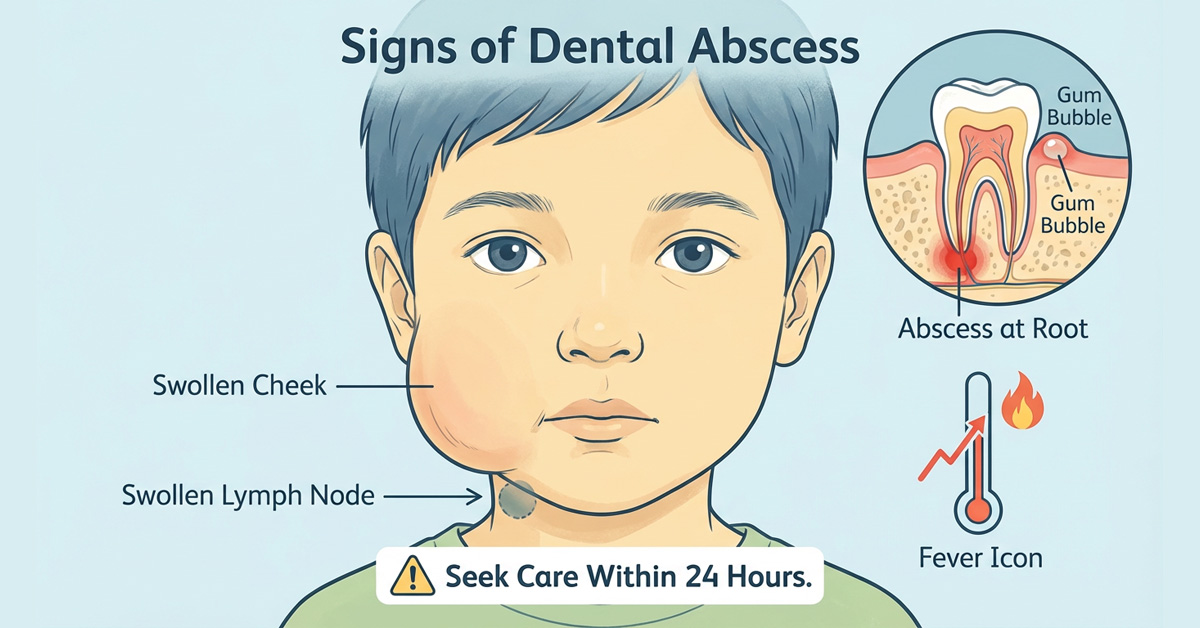
Signs of Dental Infection/Abscess
- Severe, throbbing toothache: Often worse when lying down
- Facial swelling: Puffy cheek, jaw, or under the eye
- Gum swelling: A “bubble” or “pimple” on the gum near the tooth
- Fever: Body’s response to infection
- Bad taste or smell: From pus draining into the mouth
- Swollen lymph nodes: Under the jaw or in the neck
- Difficulty opening mouth or swallowing: Indicates serious spread
When Infection Becomes an Emergency
Go to the emergency room immediately if your child has:
- Difficulty breathing or swallowing
- Swelling that’s spreading rapidly or affecting the eye
- High fever (over 102°F) that won’t come down
- Swelling under the tongue or floor of mouth
- Confusion, lethargy, or difficulty staying awake
- Inability to open mouth more than a finger-width
Dental infections require professional treatment—they will NOT go away on their own.
Treatment typically involves antibiotics, draining the abscess, and addressing the source (usually a severely decayed tooth needing extraction or root canal treatment).
Soft Tissue Injuries (Lips, Tongue, Cheeks, Gums)
Cuts to the mouth bleed a lot because the area has excellent blood supply—this looks scary but is usually good for healing.
Most soft tissue injuries can be managed at home, but some require professional care.
First Aid for Soft Tissue Injuries
- Stay calm. Mouth injuries bleed profusely but often look worse than they are.
- Apply direct pressure with clean gauze or a clean cloth for 10-15 minutes. Don’t keep lifting to check—pressure must be continuous.
- For tongue bites, have the child stick out their tongue and apply pressure by pinching with gauze.
- Apply cold compress externally to reduce swelling (wrapped ice pack on outside of lip/cheek).
- For lip injuries that go through to the outside, check if the cut crosses the vermilion border (the line between lip color and skin). These often need stitches for good cosmetic healing.
- Rinse gently with water after bleeding stops to keep the area clean.
When Soft Tissue Injuries Need Professional Care
- Bleeding doesn’t stop after 15-20 minutes of continuous pressure
- Deep laceration that gapes open (may need stitches)
- Cut crosses the lip border (vermilion border)
- Object embedded in the soft tissue
- Signs of infection developing (increasing pain, swelling, redness, pus, fever)
- Puncture wound (especially from dirty object)
- Injury to the frenum (tissue connecting lip to gum or tongue to floor of mouth) that’s torn
Loose or Displaced Teeth from Trauma
When a tooth is hit but not knocked out, it may become loose, pushed in, pushed out, or shifted sideways.
These injuries require professional evaluation—even if the tooth looks okay—because damage to the root or nerve may not be immediately visible.
Types of Tooth Displacement
| Type | Description | Urgency | Treatment |
|---|---|---|---|
| Loosened (subluxation) | Tooth is loose but hasn’t moved position | Within 24 hours | Soft diet; monitoring; possible splinting |
| Lateral displacement | Tooth pushed sideways, forward, or backward | Same day | Repositioning and splinting |
| Extrusion | Tooth pushed partially out of socket (looks longer) | Same day | Repositioning and splinting |
| Intrusion | Tooth pushed up into the gum (looks shorter or missing) | Same day—URGENT | X-rays; may need repositioning or wait for re-eruption (baby teeth) or orthodontic extrusion (permanent teeth) |
Tooth Turning Gray or Dark After Trauma
A tooth that turns gray, dark yellow, or brownish after an injury indicates damage to the blood supply or nerve.
This can happen days, weeks, or even months after the trauma.
- Baby teeth: May turn gray and can sometimes return to normal as blood reabsorbs. Many discolored baby teeth remain healthy until they fall out naturally. However, they need monitoring for signs of infection (gum bubble, swelling, pain).
- Permanent teeth: Discoloration often indicates nerve death requiring root canal treatment. See a dentist promptly for evaluation.
Clinical Insight
“One of the trickiest things about dental trauma is that problems can develop weeks or months after the injury. A tooth that looks fine initially can develop an abscess six months later because the nerve was damaged but died slowly. That’s why I always tell parents that any significant dental trauma needs a baseline X-ray and follow-up appointments at 1 week, 1 month, 3 months, 6 months, and 1 year. These follow-ups catch problems early when they’re easier to treat. If your child bumped their tooth and you never got it checked, it’s not too late—schedule an evaluation, especially if you notice any color changes.”
— Mary G. Trice
Objects Stuck Between Teeth
Children frequently get food (popcorn hulls, meat fibers) or small objects stuck between their teeth.
This is usually not an emergency but can be painful and frustrating.
How to Remove Stuck Objects at Home
- Try dental floss first. Gently work floss down between the teeth and use a back-and-forth motion. Don’t force it.
- Try a floss threader or interdental brush if regular floss won’t go through.
- Rinse vigorously with water to dislodge the object.
- Try a water flosser if available—the pressure can push out stuck debris.
- DO NOT use sharp objects (pins, needles, toothpicks) that could injure the gums or damage enamel.
If you can’t remove the object after several attempts, call your dentist.
Leaving something stuck can cause gum irritation, infection, or decay.
The dentist has specialized tools to safely remove trapped objects.
Preventing Dental Emergencies
While you can’t prevent all accidents, many dental emergencies are avoidable with proper precautions.
Mouthguards for Sports
The American Dental Association recommends mouthguards for any sport with risk of contact or falls:
- High risk: Football, hockey, lacrosse, boxing, martial arts, wrestling
- Moderate risk: Basketball, soccer, baseball/softball, volleyball, gymnastics
- Often overlooked: Skateboarding, biking, rollerblading, skiing/snowboarding
Types of Mouthguards
| Type | Cost | Pros | Cons |
|---|---|---|---|
| Stock (ready-made) | $5-$15 | Inexpensive; widely available | Poor fit; bulky; hard to breathe/talk; minimal protection |
| Boil-and-bite | $15-$40 | Better fit; easy to mold at home | Still bulkier than custom; may not fit well if not molded properly |
| Custom-fitted (dentist) | $100-$400 | Best fit; comfortable; best protection; easier to breathe/talk | Higher cost; needs replacing as child grows |
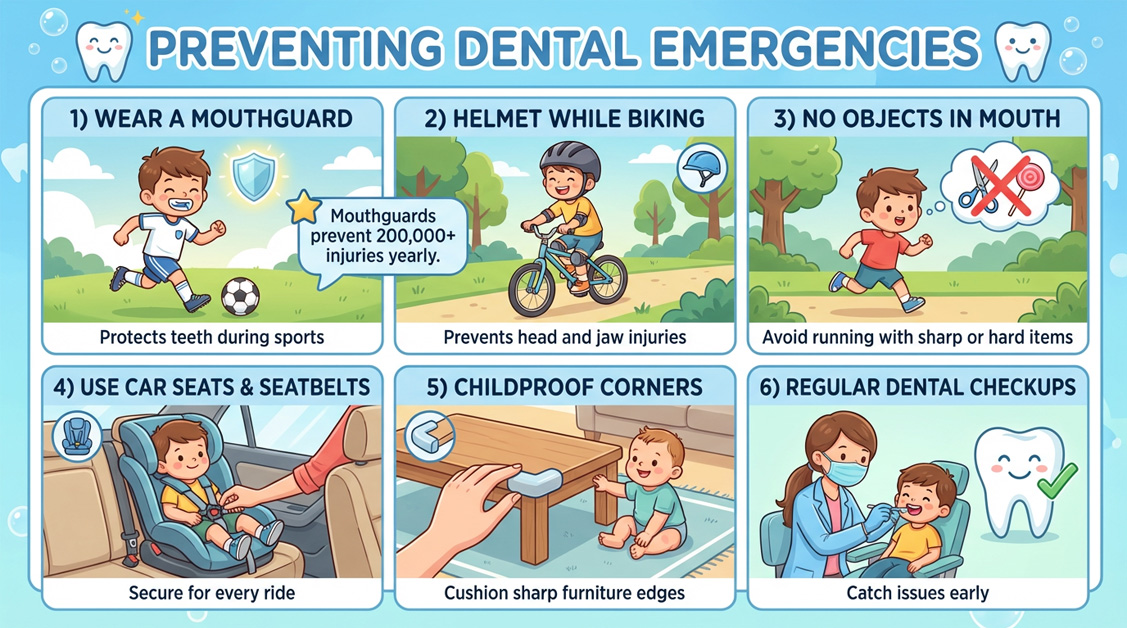
Other Prevention Tips
- Don’t let children run with objects in their mouths: Lollipops, toothbrushes, toys
- Use car seats and seatbelts properly: Motor vehicle accidents are a major cause of dental trauma
- Childproof your home: Pad sharp corners on furniture; use non-slip bath mats
- Address protruding front teeth: Children with significant overjet are more prone to dental injury; early orthodontic evaluation may help
- Prevent cavities: Untreated decay weakens teeth and can lead to infection emergencies
- Regular dental checkups: Catches problems early before they become emergencies
Emergency Room vs. Dentist: Where to Go
| Go to the EMERGENCY ROOM | Call/See Your DENTIST |
|---|---|
|
|
Important: ERs can manage life-threatening complications (infection, bleeding, airway compromise) and provide antibiotics or pain medication, but they often cannot provide definitive dental treatment.
You’ll likely still need to follow up with a dentist.
For purely dental problems (knocked-out tooth, broken tooth), a dentist who handles emergencies is usually the better choice if available.
Be Prepared: Create Your Emergency Plan
- Save your pediatric dentist’s emergency number in your phone contacts
- Know their after-hours policy: Do they have an emergency line? Who covers weekends?
- Know your nearest pediatric dentist who handles emergencies
- Keep a small dental emergency kit: Gauze, small container (for milk), dental wax, pain medication
- Share this information with caregivers, grandparents, and babysitters
Frequently Asked Questions
What should I do if my child knocks out a baby tooth?
Do NOT reimplant a baby tooth—this can damage the permanent tooth developing underneath.
Control bleeding with gentle pressure, apply a cold compress for swelling, and contact your pediatric dentist within 24 hours.
Save the tooth to bring to the appointment so the dentist can confirm it came out completely.
They’ll assess whether a space maintainer is needed.
How do I know if my child’s tooth is a baby tooth or permanent tooth?
Baby teeth are smaller, whiter, and have shorter roots.
Permanent teeth are larger, slightly more yellow, and have longer roots.
Front baby teeth typically fall out between ages 6-8; back baby teeth between ages 10-12.
If you’re unsure, save the tooth in milk and let the dentist determine which type it is—don’t risk delaying treatment for a permanent tooth.
My child chipped a tooth but isn’t in pain. Do I still need to see a dentist?
Yes, though it’s not usually an emergency. Schedule an appointment within a few days.
The chip may expose dentin (the layer under enamel) making the tooth vulnerable to decay and sensitivity.
The dentist can smooth sharp edges, apply bonding material if needed, and take X-rays to check for hidden damage.
Pain may develop later if the nerve was affected.
My child’s tooth turned gray after bumping it. Is this an emergency?
It’s not an immediate emergency, but you should see a dentist within a week.
Gray discoloration indicates bleeding or nerve damage inside the tooth.
Baby teeth may survive and function normally despite discoloration, though they need monitoring for infection.
Permanent teeth that turn gray usually require root canal treatment. X-rays will help determine the extent of damage.
Should I go to the ER or wait for the dentist for a knocked-out permanent tooth?
Time is critical—the tooth has the best chance of survival if reimplanted within 30-60 minutes.
If your dentist is available, they’re the best choice as they can definitively treat the tooth.
If it’s after hours and you can’t reach a dentist, the ER can help reimplant the tooth or store it properly.
Call ahead to both options and go to whoever can see you fastest. Don’t delay trying to decide.
My child has a toothache at night. What can I do until I can see the dentist?
Give appropriate pain medication (children’s ibuprofen is often most effective for dental pain).
Have your child rinse with warm salt water. Apply a cold compress externally. Keep their head elevated on extra pillows. Avoid hot, cold, and sweet foods.
Call your dentist’s emergency line if available, or schedule the earliest appointment possible.
Seek emergency care if there’s fever, facial swelling, or difficulty swallowing.
What type of mouthguard is best for my child?
Custom-fitted mouthguards from the dentist offer the best protection and comfort, but boil-and-bite guards from sporting goods stores are a good alternative.
Stock mouthguards offer minimal protection. For high-contact sports like football or hockey, invest in a custom guard.
For lower-risk activities, a well-fitted boil-and-bite guard is usually adequate.
The best mouthguard is the one your child will actually wear.
How can I tell if my child has a dental abscess?
Signs of abscess include severe throbbing toothache, facial or gum swelling, fever, swollen lymph nodes under the jaw, a “gum bubble” or “pimple” on the gum near the tooth, and bad breath or foul taste (from draining pus).
Abscesses require professional treatment—they won’t go away on their own and can spread to become life-threatening.
Seek care within 24 hours, or immediately if there’s difficulty breathing or swallowing.
Sources & References
- American Academy of Pediatric Dentistry. (2024). Guideline on Management of Acute Dental Trauma. AAPD Reference Manual. https://www.aapd.org
- American Association of Endodontists. (2024). Knocked-Out Teeth. https://www.aae.org
- American Dental Association. (2024). Dental Emergencies. MouthHealthy.org. https://www.ada.org
- American Dental Association. (2024). Mouthguards. https://www.ada.org
- Centers for Disease Control and Prevention. (2024). Dental Care in Emergency Departments. https://www.cdc.gov
Medical Disclaimer
This guide provides general information about pediatric dental emergencies and is not a substitute for professional medical advice. In any emergency, contact your pediatric dentist, call 911, or go to the nearest emergency room. Every situation is unique—when in doubt, seek professional care immediately. Information current as of January 2026.

Mary – Queens Pediatric Dental Resource Manager. I’m a dental health researcher and parent advocate based in Queens, NY. After struggling to find reliable pediatric dental information during my own child’s dental emergency, I created this resource to help other Queens families navigate their children’s oral health needs.
I curate evidence-based information from leading pediatric dental organizations, peer-reviewed research, and trusted dental health experts. While I’m not a dentist, I’m committed to providing accurate, practical guidance that helps parents make informed decisions.
All content is thoroughly researched and includes proper medical disclaimers directing families to consult qualified pediatric dentists for their children’s specific needs.